Video Search Engine Using OpenAI's CLIP
by John Robinson @johnrobinsn
In this article, I'll describe a tiny video search engine and indexer that will let you search through a video with descriptive "natural language" queries and find matching frames of video. All the code is included in a Google Colab Notebook. So even if you don't have your own cuda-capable GPU, you can easily run the code yourself without setting up anything on your own computer.
OpenAI's CLIP model was one of the biggest advancements in computer vision last year. CLIP integrates both vision and language into a single multimodal model. This model was trained on 400 Million image/text pairs obtained by crawing the Internet. An image along with it's english language text caption is an example of an image/text pair. This approach allowed the CLIP team to leverage the Internet as a large source of "prelabeled data" without needing to manually label any of the images themselves. Another advantage to this approach is that english language captions typically encode much more about what is happening in the image than a simple class label like "dog" or "cat". This additional context allows the model to develop clusters of latent features within the model for abstract concepts across both images and text. This gives CLIP the ability to generalize to classes of objects that it hasn't been directly trained on.
The CLIP model has been trained to unify the feature space of images along with the feature space of text that describes those images. Given an image, CLIP can be used to generate a feature map in the form of a n-dimensional vector which will represent the salient features of the image. In addition, given a string of text the CLIP model can be used to generate a feature map in the form of a n-dimensional vector that represents the salient feature of the text string. The magic comes from the fact that the image and text feature maps are in the same n-dimensional space which allows them to be compared and correlated. There are multiple CLIP models available differing in the type of network used for the image encoder. For this project, I'll be using one of the ResNet models, namely, RN50x4.
Please refer to the article referenced above or to the CLIP paper, if you'd like to delve deeper into CLIP itself.
The remainder of this article will focus on using CLIP to build a tiny video search engine and indexer. The resulting search engine will allow us to search through a video using descriptive natural language queries, such as "a woman wearing pink pants" or "a laundromat sign". The expressive power of CLIP enables this to work surprisingly well.
Here is the notebook with all of the code for this article.
Sample Video #
I've provided a sample video to use with this project, but it's also pretty easy for you to load up your own video for your own experimentation. This is a random video from the Internet that CLIP has never been exposed to before.
Handling Video #
We'll be using the python OpenCV module to process our video. OpenCV makes it pretty easy to load and decode video frames. But one small annoyance with OpenCV is that it tends to work with pixel data in the BGR pixel format. The CLIP model has been trained on images in the RGB pixel format and is the more common convention. So we'll need to convert any pixel data that we obtain from OpenCV to RGB. OpenCV does have a function for converting between the pixel formats called cvtColor. We'll use this function to do our channel swizzling for us. In order to make the job of handling video frames a little easier and to keep the code cleaner, we wrap the OpenCV bits with the following utility functions.
# generator yielding a video frame and a frame timestamp (seconds) each time
def video_frames(path):
  video = cv2.VideoCapture(path)
  fps = video.get(cv2.CAP_PROP_FPS)
  ret, frame = video.read()
  count = 0
  while ret:
    count = count + 1
    frame = cv2.cvtColor(frame,cv2.COLOR_BGR2RGB)
    yield frame,count/fps
    ret, frame = video.read()

# returns a single video frame at the specified timestamp (seconds)
def video_frame(path,timestamp=0):
  video = cv2.VideoCapture(path)
  fps = video.get(cv2.CAP_PROP_FPS)
  video.set(cv2.CAP_PROP_POS_MSEC, timestamp * 1000)
  ret,frame = video.read()
  frame = cv2.cvtColor(frame,cv2.COLOR_BGR2RGB)
  return frame if ret else None
The function, video_frames is a generator that opens the specified video file and yields the pixel data and the timestamp for a single frame each time it's invoked. It also converts the pixel data from the BGR pixel format to the more convenient RGB pixel format.
The other function, video_frame, returns the pixel data for a single frame also converted to RGB given a path to the video file and a timestamp into the video.
Search Engine And Indexer #
The next code block shows the entire code for the video search engine and indexer.
class ClipIndex:
  def __init__(self,patch_size=720//2):
    self.patch_size = patch_size
    self.patch_shape = (self.patch_size,self.patch_size,3)
    self.patch_step = self.patch_size//2
    self.device = 'cuda' if torch.cuda.is_available() else 'cpu'
    logging.info("Loading CLIP Model")
    self.clip_model,self.clip_prep = clip.load('RN50x4',self.device,jit=False)
    # This will be our video
    # index_feature will be a tensor that contains all of the CLIP features encoded for our video
    self.index_features = None
    # contains the metadata for every image feature held in index_features
    self.index_metadata = []

  def indexVideo(self,path,freq=1.0):
    last_index = 0
    duration = video_duration(path)
    logging.info('Indexing: {}'.format(path))
    with tqdm(total=math.ceil(duration)) as progress_bar:
      for frame,timestamp in video_frames(path):
        if timestamp - last_index > freq:
          progress_bar.update(math.floor(timestamp)-progress_bar.n)
          last_index = timestamp
          frame_features = []
          frame_metadata = []
          # chop frame up into patches
          patches = patchify(frame,self.patch_shape,self.patch_step).squeeze()
          # patches is a 2d array of images patches lets unravel into a 1d array of patches
          shape = patches.shape
          patches = patches.reshape(shape[0]*shape[1],*self.patch_shape)
          # clip wants PIL image objects
          pils = []
          for p in patches:
            frame_metadata.append({'path':path,'t':timestamp})
            pils.append(self.clip_prep(Image.fromarray(p)))
          # put all of the images patches into a single tensor
          tensor = torch.stack(pils,dim=0)
          uploaded = tensor.to(self.device)
          # ask CLIP to encode the image features for our patches into a feature vector
          with torch.no_grad():
            frame_features = self.clip_model.encode_image(uploaded)
          assert(frame_features.shape[0] == len(frame_metadata))
          # normalize the image feature vectors so that they all have a length of 1
          frame_features /= frame_features.norm(dim=-1,keepdim=True)
          if self.index_features is not None:
            self.index_features = torch.cat((self.index_features,frame_features),dim=0)
          else:
            self.index_features = frame_features
          self.index_metadata.extend(frame_metadata)
      progress_bar.update(progress_bar.total-progress_bar.n)

  def search(self,query,n=6,threshold=35):
    # ask CLIP to encode our query into a feature vector
    query_tensor = torch.cat([clip.tokenize(query)]).to(self.device)
    with torch.no_grad():
      query_features = self.clip_model.encode_text(query_tensor)
    # normalize the query feature vector so that it has a length of 1
    query_features /= query_features.norm(dim=-1,keepdim=True)
    # do the actual search here by calculating the distances between the query vector
    # and all of the image features from our video with a single dot product
    similarity = (100.0 * query_features @ self.index_features.T)
    # lets pull out the best matches
    values,indices = similarity[0].topk(min(n*10,len(self.index_metadata)))
    # build and return the result set
    result = []
    time=0
    for i,d in enumerate(zip(values,indices)):
      # i: count; d[0]: score; d[1]: index
      meta = self.index_metadata[d[1]]
      if len(result) < n and d[0] > threshold and abs(meta['t']-time) > 0.1:
        time = meta['t']
        result.append({'score':float(d[0]),'path':meta['path'],'t':meta['t']})
    return result
Indexing Images #
Let's do a quick run through of the indexer. Basically we iterate over every frame of the video, but we only index a single frame per second. This helps control the size of the index and works well in practice since there is a lot of temporal redundancy in the frames over time. But this is something that you can easily tune. The video that we're working with here has a frame size of 1280x720 (720p). But since CLIP is not trained on images of this size, we use patchify to chop up each frame into a number of overlapping square patches. We then reshape the array of patches to make it easier to feed into the CLIP model. The patch size is also something else that you could tune. But using patches here allows for CLIP to better attend to different parts of the video frame and yields better results. The CLIP model also has an image preprocessing procedure that massages the image data to work with the CLIP model. Such preprocessing typically "centers" and normalizes the pixel data, for more details on the preprocessing used here please refer to the CLIP paper. We then use CLIP to generate features for each of the patches. CLIP encodes features into a 640D (640 dimensional) tensor. CLIP uses this array of 640 floating point numbers to describe (encode) both images and image captions. We then normalize the image feature vector by dividing each element of a given vector by the vector's total length. This normalizes all of the image feature vectors so that they're all of length 1. We then simply concatenate all of those feature vectors into a single tensor(one feature per patch) to represent the entire video. This tensor(index_features) along with an array of metadata about each patch(index_metadata) is effectively our video index.
Hyperspheres and Feature Vectors #
By normalizing the features vectors to be of length 1, the ends of the feature vectors now lie on the surface of a n-dimensional hypersphere. We can now think of each normalized feature (image or text) as a point that lies on the surface of this hypersphere.
But how do we compare two features? We need to calculate how close two of these points are together. There are a number of ways to go about this but a common way is to calculate the cosine similarity of the two vectors. The cosine similarity is the cosine of the angle between the two vectors. This value will range from 1 to -1. When the cosine similarity is closer to 1 it means that the vectors are very similar, with 1 meaning that they are identical; closer to -1 it means that the vectors are more different. If the feature vectors are already normalized to a length of 1, the cosine similarity can be calculated by doing a single dot product operation between the vectors.
Search #
To search, we encode our query string into a feature vector using the encode_text method of the CLIP model. This emitted feature vector will also be a 640D vector. Again, we normalize the feature vector so that the vector is of length 1. We then calculate the similartity of this query vector with all of the image vectors that we generated when we built the index.
Since we have the normalized feature vectors for all of the image patches stacked into a single tensor. We can calculate the cosine similarity between the normalized text vector and all of the normalized image patch feature vectors with a single dot product operation.
This line of code calculates the similary between the single text feature vector (query_features) and all of the image patch features in one operation using the python's built-in dot product operator, '@'. The similarity is scaled up by 100 for usability reasons.
similarity = (100.0 * query_features @ self.index_features.T)We use the torch.topk operation to pick out the top k scores (default 60) which also has the side effect of sorting the returned results. The number 60 is of no real significance. That number was chosen just to given enough samples to make sure we can return the requested number of results while throwing out search results that are clustered too closely together in time.
The results of a call to the search method with the query, 'a red car' is shown here.
[{'path': 'neighborhood720p.mp4', 'score': 40.46875, 't': 118.70833333333333},
 {'path': 'neighborhood720p.mp4', 'score': 38.15625, 't': 121.83333333333333},
 {'path': 'neighborhood720p.mp4', 'score': 38.0625, 't': 120.79166666666667},
 {'path': 'neighborhood720p.mp4', 'score': 38.0, 't': 9.375},
 {'path': 'neighborhood720p.mp4', 'score': 38.0, 't': 7.291666666666667},
 {'path': 'neighborhood720p.mp4', 'score': 37.75, 't': 118.70833333333333}]
Each result returned includes the path to the indexed video file, the score and the timestamp within the indexed video.
And that's it. A tiny piece of code that can index a video and let us perform natural language queries on it. Pretty amazing.
The Results #
I won't replicate all of the code here. Please refer to the colab notebook. But here are a couple of search examples.
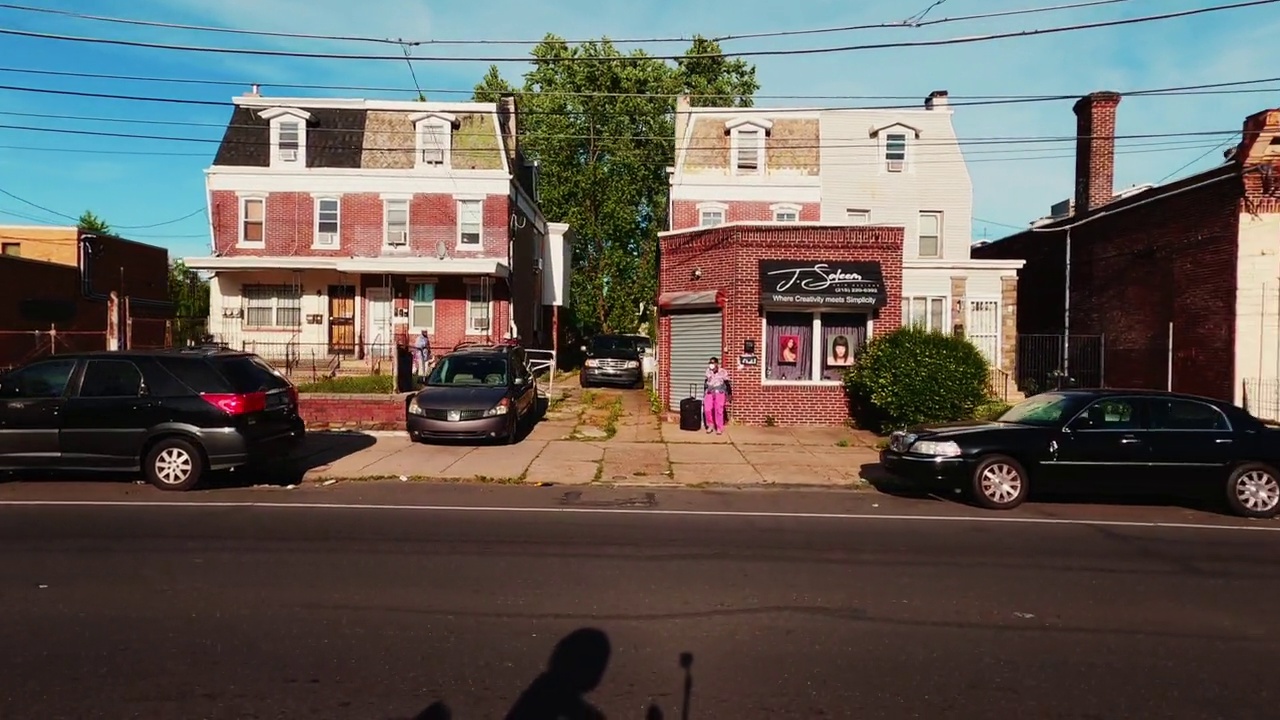
Query: a woman in pink pants
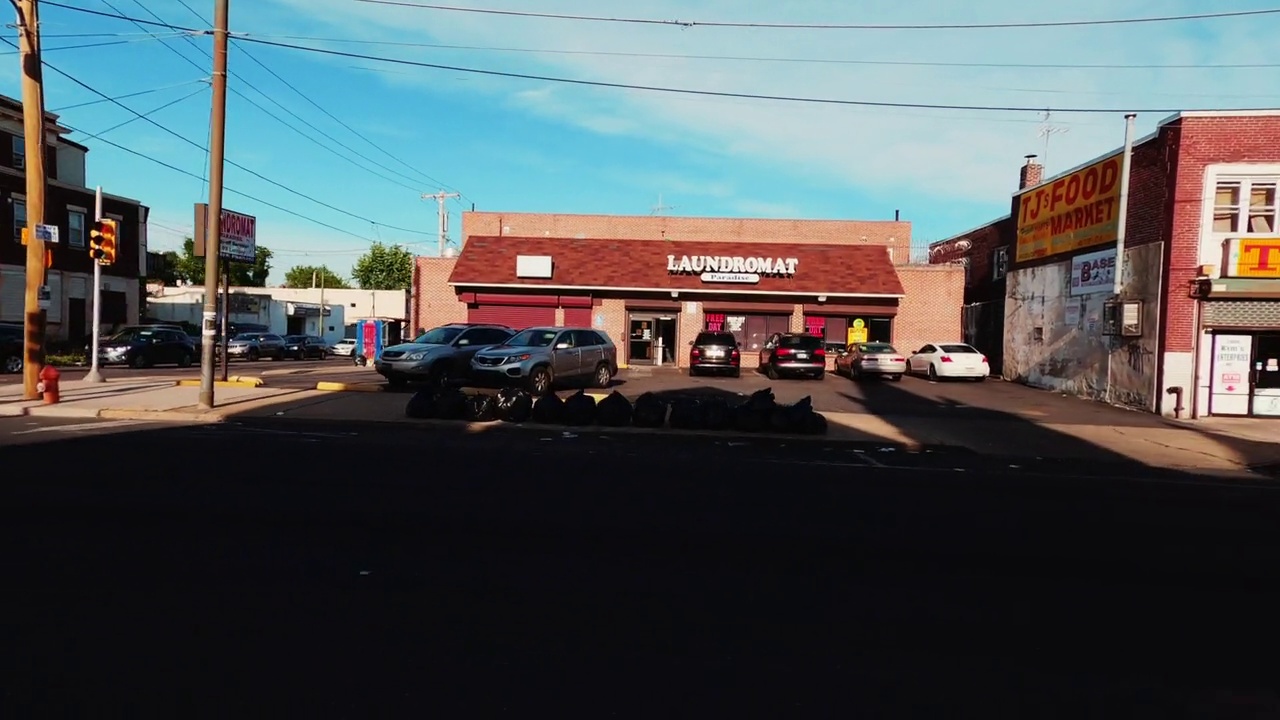
Query: a laundromat sign
This demonstrates CLIP recognizing text within the image.
There are a lot more query examples in the notebook. Check it out.
Mentions #
The video used for this article can be found here,
Video by Kelly L from Pexels. If you appreciated this article, please consider making a donation to the videographer, Kelly L, given the provided link.
In addition, some inspiration for this article can be found in this code repo by johanmodin.
Share on Twitter | Discuss on Twitter
John Robinson © 2022-2025
- Next: Pong From Pixels.
- Previous: Unleash the GPU in your Colab Notebook